DIY Stair Handrail with Industrial Pipes and Wood
If your stair railing is sometime, dysfunctional, not to lawmaking, or simply not to your sense of taste, you lot may accept considered irresolute it for something new, safe, and stylish.
 View in gallery
 This might seem a daunting task, but for a straightforward stair railing, you can DIY a new one yourself with a few basic tools. This tutorial will take you through the pace-past-pace procedure of removing your old stair railing, building your new one, and installing and securing it.
 View in gallery
 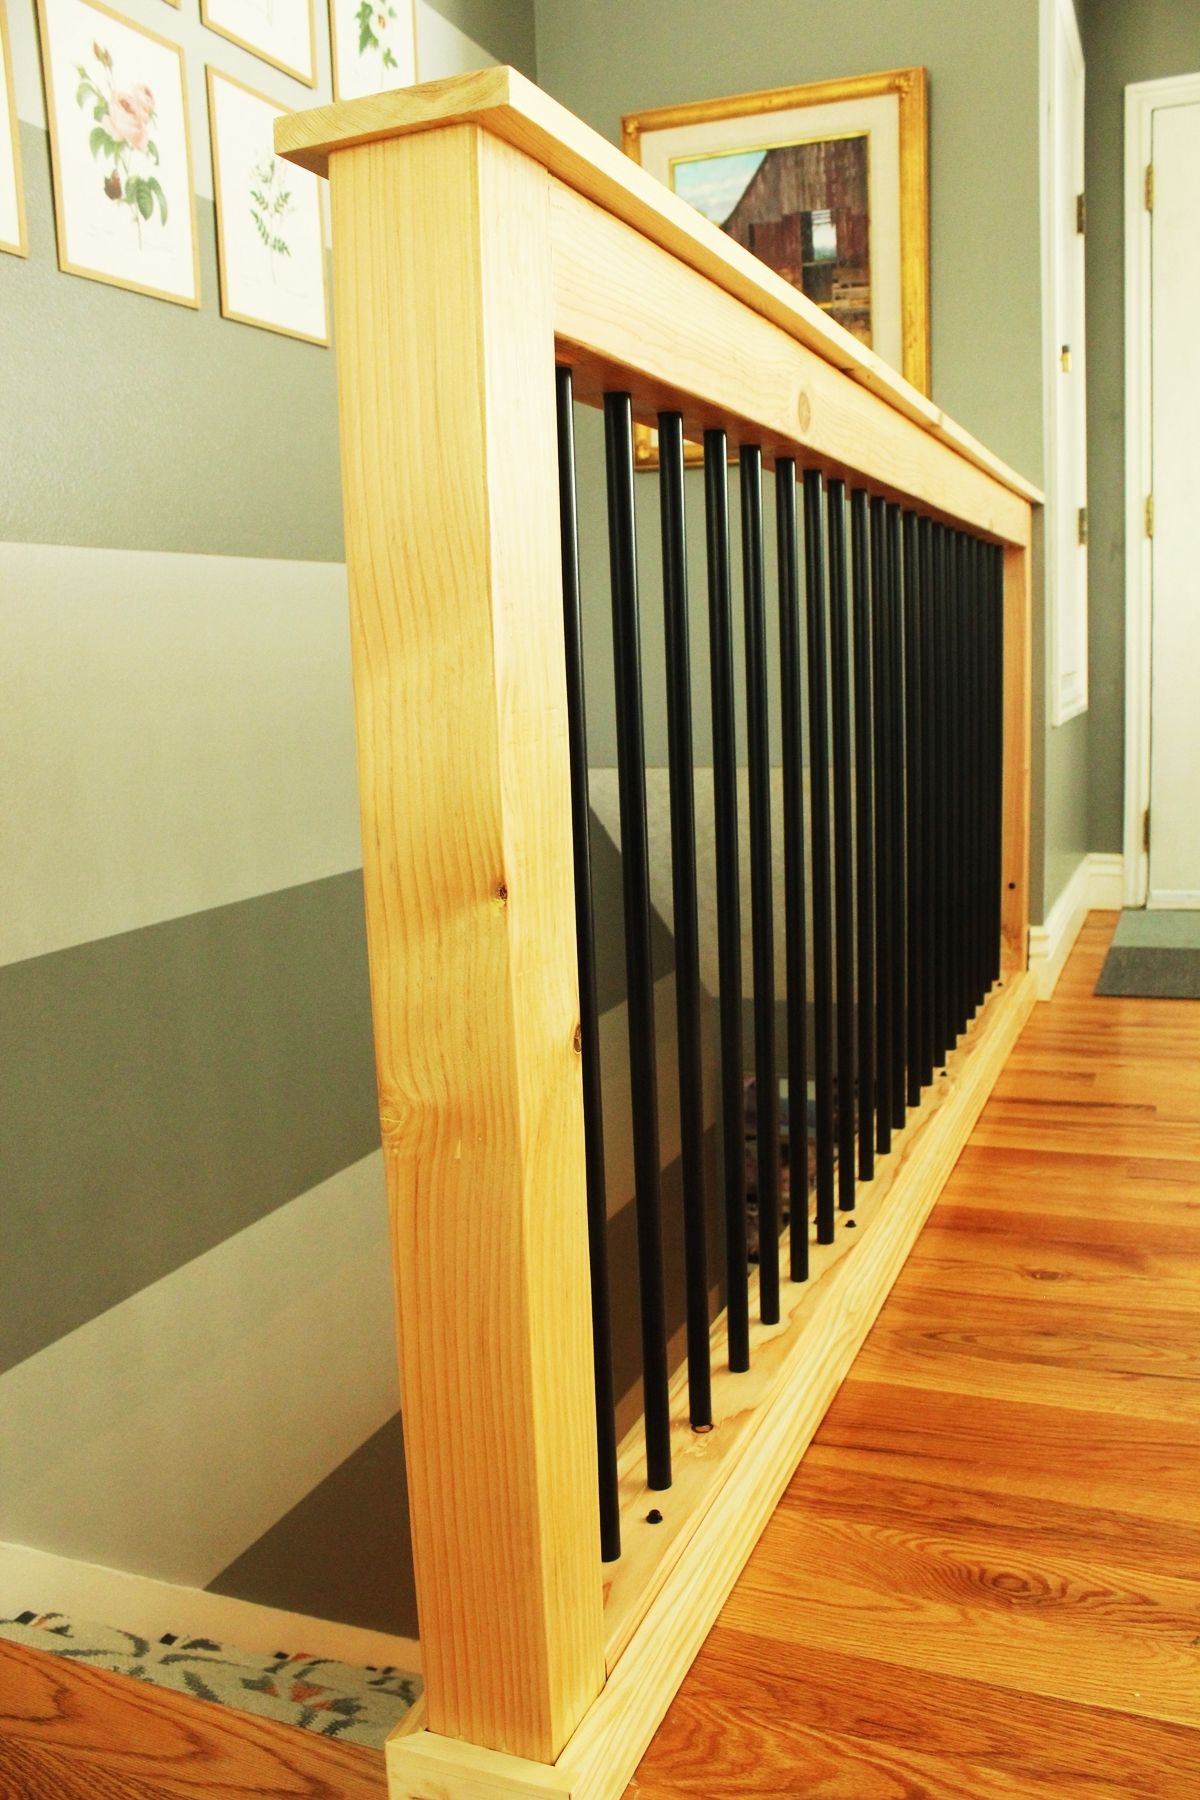 View in gallery
 Of form, you lot can (should!) customize your own stair railing (a benefit to whatsoever DIY project). Yous'll demand to check edifice codes in your expanse and plan accordingly. This tutorial shows a straight stair railing that is less than 8' long (thus requiring no center support), with balustairs/track that are spaced 4" on center. Finished, information technology is about 40" in height.
 View in gallery
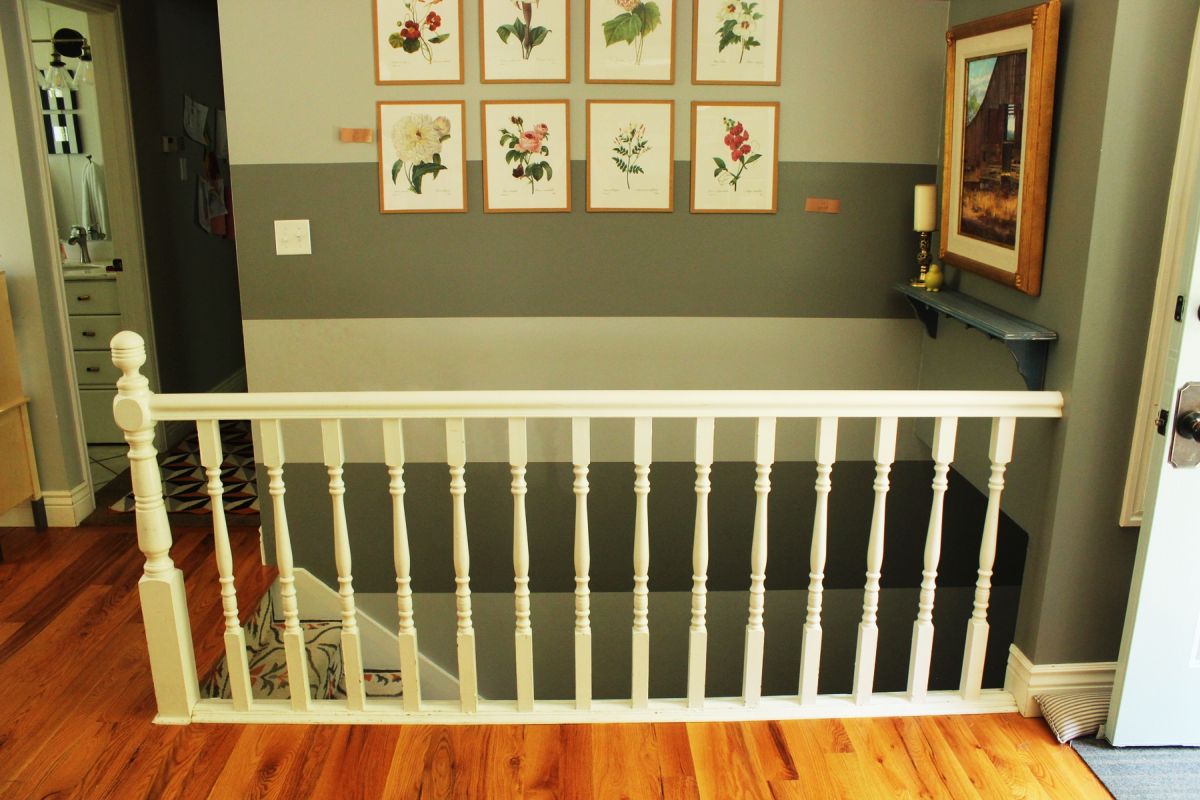
 This is how the stair railing looked earlier. It is original to our early on 1980s home.
 View in gallery
 Rail are wooden and generic in style.
 View in gallery
 The railing was painted white and shows every knick and speck of dirt and splash of raspberry jam. I suppose the latter is forgivable…merely merely just.
 View in gallery
 All of those corrective complaints would be cypher, though, were it not for the significant condom event facing this original railing: spacing between parts of the track exceeded iv" (sometimes by almost a whole inch), and we have had infants' and toddlers' heads get frighteningly stuck between the rails. Not skillful.
 View in gallery
 So, permit's get to it. You'll desire to measure out the length of your railing, from wall to the outer edge of where your post volition be. In this example, nosotros built the new railing to precisely replace the original railing footprint.
 View in gallery
 The bare-basic plan for this new railing is this: 4x4s for the 2 side posts, 4x4s for the superlative and lesser rails attaching between the vertical posts, and a 1×six as the acme surface of the railing.
 View in gallery
 Measure out and mark the length of your peak railing (minus the width of your two posts) on the 4×4. Tip: Cull the best four×4 for the task of your height and lesser railings. Remember that the superlative side of your meridian railing will be covered with the 1×6 piece, so y'all can use your worst side for the top of the top railing. Aforementioned for the bottom of the lesser railing. The sides and the top of the bottom railing are going to exist well-nigh visible, so choose the best iv×4 faces for these positions.
 View in gallery
 Apply a miter saw to cut your four×4 precisely. Echo this for your bottom railing.
 View in gallery
 Now information technology's time to mensurate your posts. Yous'll want to work backward on this. The length of the pipe spindles/rails (standard are 26" and 32" rails) plus the height of your top and bottom railings PLUS the 1×6 cap piece must be to code. In this example, we exceeded code, with a 39-three/4" handrail acme, floor to height. (32" rail + 3-1/2" nominal height of 4×4 height railing + 3-1/2" bottom railing + 3/4″ nominal tiptop of ane×6 cap.) So, in my case, the posts themselves are 39" (the height of everything except the i×six cap).
 View in gallery
 Mensurate, mark, and cut your posts. At this point, you should have two identical-length top and bottom railings and two identical-length side posts, all out of 4×iv.
 View in gallery
 At this point, I similar to take stock of all the pieces and decide which pieces volition go where. In a place that will be covered or hidden, I write the piece's orientation to my infinite then that I continue my favorite lumber faces exposed and front-and-eye (and the worst faces tucked away).
 View in gallery
 Information technology'south now time to fix all the joints that need to happen on this handrail/railing. Because you lot're using iv×four lumber, yous'll need the Kreg HD jig (the regular jig doesn't fit 4×4 lumber). Skillful news: Information technology'due south impossibly piece of cake to set up and utilise.
 View in gallery
 Start, adjust the stop collar on your Hd drill chip then it is four-3/4" away from the shoulder of the bit. Tighten the stop collar into place.
 View in gallery
 Side by side, attach the finish block to the drill guide. Place the drill bit through the drill holes, and make certain that the tip of the drill fleck is iii/eight" away from the stop block. Adjust if necessary.
 View in gallery
 Accept one of your vertical posts and, on the bottom end of the side that will be facing you when the handrail is installed (contrary the stairs), center and clamp the drill guide in place.
 View in gallery
 I concluded upward using ii clamps with each placement (only one clamp is shown here) for a more secure fit. Notice how the stop cake butts up against the bottom border of the mail.
 View in gallery
 Drill into the ii guide holes to create two pocket holes.
 View in gallery
 When you're drilling into 4x4s, you don't have to adjust the drill guide to get 2 perfectly spaced and centered pocket holes. That's a bonus.
 View in gallery
 Turn your post over, and drill two more holes on the exact opposite side of the bottom of your post. At this point, you should have four pocket holes drilled into the two opposite sides of i vertical post. These drilled sides will be the sides that face the stairs and the room; the two not-drilled sides will face the railing and wall (or whatever else lies along that handrail axis at your firm). Repeat this step on the bottom end of your other vertical post.
 View in gallery
 If you're mounting the handrail to a wall, you volition drill pocket holes into the pinnacle finish of ONLY the mail service that mounts to that wall. In this instance, ane vertical post mounts to a wall, and the other is a freestanding postal service in the centre of nothing, at the top of the stairs. And so, toward the "wall" side on the peak of this vertical postal service, I will drill two pocket holes.
 View in gallery
 Place the drill guide appropriately; it's going to await strange. Drill your pocket holes through the top border.
 View in gallery
 This post is now ready to be installed on the wall via the top, and attached to the floor (on the two sides 90-degrees from this wall-mountain side) via pocket screws on the bottom sides. Perfect.
 View in gallery
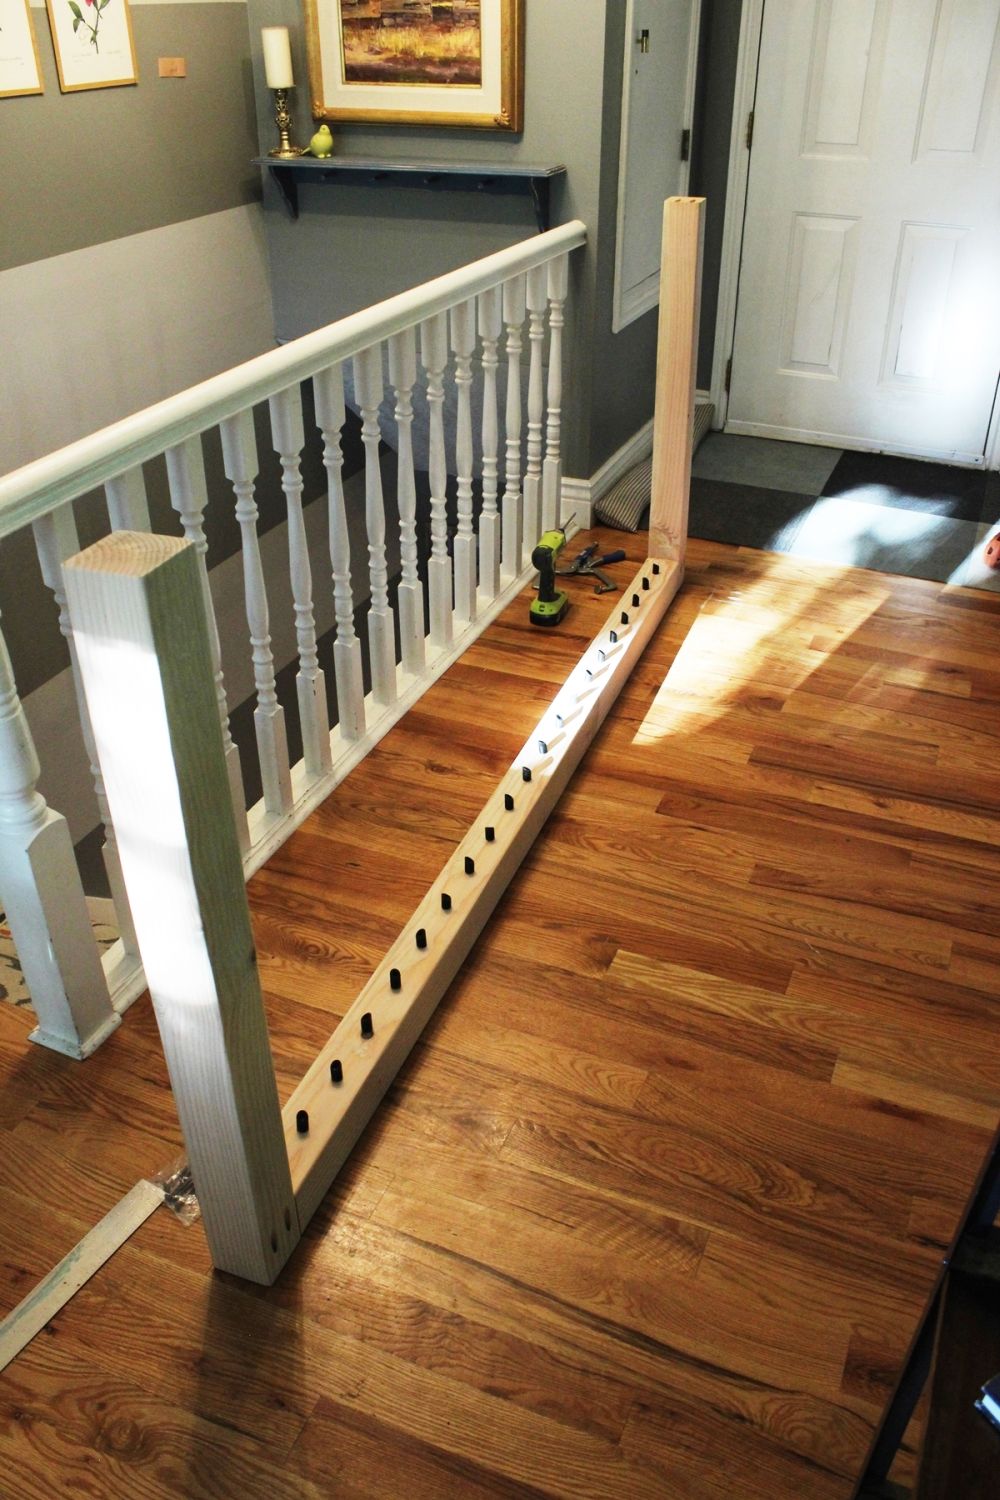
 Earlier any installing is done, however, we still need to set the meridian and bottom railings. Characterization these accordingly. You'll detect that the top of the top railing is a bit chewed up; this is okay, because it volition exist covered with the 1×6 cap piece. I also label which mode each end of the railing is facing.
 View in gallery
 On both ends of the meridian of the TOP railing (I know that probably sounds complicated, just accept it slowly in your encephalon), drill ii pocket holes. These holes are for attaching the railing to the vertical posts. And then, spin your Height railing over 180 degrees and then y'all're looking at the bottom of the acme railing; drill two more than pocket holes into each side. At this point, on your Superlative railing, you should take four pocket holes at each end; 2 on meridian, and two on lesser. Tip: The bottom holes on your peak railing will technically be visible, simply because they're on the bottom of the railing, you won't actually run across them. The top holes on your elevation railing will (y'all could recite this in your sleep by now) be covered past the one×half dozen cap slice. On only the bottom side of your Bottom railing, drill two pocket holes on each end. DO Not DRILL POCKET HOLES INTO THE Meridian SIDE OF YOUR Lesser RAILING, every bit these will exist totally visible and will be ugly.
 View in gallery
 On the facing sides of your railings (due east.m., the top side of your lesser railing, and the bottom side of your top railing), utilize a guide to drill light holes to mark the spindle/rail placements. This example shows rails spaced precisely 4" on eye, which means the actual space between the track is less than iii-ane/2" because the track themselves are 3/four″ in bore.
 View in gallery
 Mark these track points in the aforementioned direction on your pinnacle railing as on your bottom railing; that is, orient your railings and then the ii left sides align and the two right sides marshal, then utilize your template moving in the same direction on each railing. This will facilitate perfection in vertically aligned rails/spindles.
 View in gallery
 Utilize a medium grit (120) sandpaper, and sand everything. Don't forget the corners.
 View in gallery
 Wipe away the dust.
 View in gallery
 Apply woods filler to cracks, splits, knot holes, or any imperfections that y'all want to seal up on the sides of your 4x4s that volition be visible.
 View in gallery
 Smooth the wood filler, but don't stress about getting information technology perfect at this indicate. You'll sand it downwards after it dries thoroughly.
 View in gallery
 Permit the wood filler dry completely. Tip: Place your 4x4s on a slightly raised surface to allow maximum air flow and circulation while they dry.
 View in gallery
 When the wood filler is completely dry, use a fine grit (220) sandpaper and have at it.
 View in gallery
 The directions on my wood filler recommends paw sanding (as opposed to a higher-speed orbital sander). I did both and noticed no divergence in the wood filler; the only difference I did notice was that the orbital sander was much faster. So. Choose the level of risk you're feeling up for, and go with it.
 View in gallery
 With your railings sanded and smoothed out, you lot can do i of 2 things. You lot can end (pigment, stain, seal, whatever) the wood before doing annihilation else, or yous tin install the baluster connectors. Because nosotros weren't certain what finish we wanted at this indicate, we went ahead with the rail/spindle connectors.
 View in gallery
 The most important affair with screwing these connectors in place is, bated from their bodily precise placement along the board itself, to screw them in exactly straight up-and-down.
 View in gallery
 With everything sanded and ready to become, it's time to move inside and begin install. To begin, we'll attach the bottom railing to the vertical posts via the two pocket holes on the bottom side of the bottom railing.
 View in gallery
 Utilise a right-angle clench to hold the pieces in place and together, afterwards double-checking the positioning of the vertical postal service.
 View in gallery
 Apply 2-ane/2" Hd pocket screws to attach the railing to the post.
 View in gallery
 Repeat for the other vertical mail. Your handrail is held together at this betoken with 4 pocket screws on the bottom (ii on each cease) and now resembles a "U" shape.
 View in gallery
 This step is optional, but I recommend it. Dry-fit the runway/spindles/balusters (any y'all desire to telephone call them) onto your connectors, then identify your tiptop railing onto them. Use a rubber mallet to gently tap the meridian railing down so it is flush with the acme of your vertical posts.
 View in gallery
 Don't worry if it doesn't side exactly foursquare at this unconnected indicate; you lot'll square everything upwards when yous install the handrail.
 View in gallery
 You can position the handrail where it'southward going to get; bank check it out for size, look, fit, whatever. At present is the time to make any obvious adjustments. (Although hopefully y'all have none to make because it'southward perfect!)
 View in gallery
 Adjacent step is to remove the existing handrail. Every railing is probably a trivial scrap different, depending on who installed it/how it was installed. Just we began by removing whatsoever existing trim pieces and visible screws.
 View in gallery
 Next came a pounding out of the spindles.
 View in gallery
 The top railing came off next…
 View in gallery
 …followed past the bottom "railing."
 View in gallery
 Because the wall that nosotros're connecting to has baseboards, we'll have to cut that out in order to fit our handrail affluent confronting the wall itself. Use a square to mark precisely where the baseboard needs to exist cut.
 View in gallery
 Use a multi-function (Dremel) tool to cut information technology out.
 View in gallery
 A file or chisel and hammer should remove the baseboard clamper pretty easily.
 View in gallery
 In that location we go. Flat wall for our vertical post.
 View in gallery
 Except, of course, the bolt that held the original tiptop railing to the wall. This was installed inside our wall from the nearby closet. Instead of breaking through walls to try to remove this thing, we decided to exit it there.
 View in gallery
 Holding the vertical mail service level and straight next to the wall, we marked where this particular bolt would hit our post, then drilled out a hole for information technology to live in for the next 40 decades. You're welcome, piddling bolt.
 View in gallery
 We then turned our attention to removing the rest of the post. Ours was attached into the floor itself. And then we used a reciprocating saw to carefully cut the postal service at the level of the sub-floor (or whatever level the balance of your handrail will be sitting on), then flattened and smoothed the surface as needed with a file and hammer.
 View in gallery
 Some of the hardwood (about 1/iv″ on two sides) had to be cut out as well. To be honest, that injure a little considering it feels so, I don't know, permanent. Simply it enabled a secure and beautiful fit for our new handrail post.
 View in gallery
 With the handrail fitting into its perfect footprint, it'southward now time to mountain it. We slid the wall post to be flush against the wall, keeping the rest of the handrail also aligned. Tip: This is definitely a two-person chore, as yous'll want to ensure level at all three dimensions before yous install.
 View in gallery
 If you recall, we don't currently have a method in place to attach the bottom function of the vertical post to the wall. Don't worry. This is where 6" timber screws come into play.
 View in gallery
 Remove the acme railing and several (if not all) of your spindles.
 View in gallery
 Make up one's mind the level/superlative at which y'all want your timber screws to be installed, and so pre-drill holes into your 4×4 at that/those positions. Tip: Be sure to cheque for framing stud presence first, or the timber screws won't exist much help.
 View in gallery
 Slide and agree the handrail in place, flush confronting the wall and level every other direction, then spiral the timber screws into the wall.
 View in gallery
 Use ii-1/2" HD pocket screws now to attach the bottom of the now-wall-mounted vertical post to the floor, two screws on each side through the pocket holes.
 View in gallery
 Also, double checking the flush and level lines, attach the meridian of the vertical postal service to the wall via the two top-edge pocket holes.
 View in gallery
 This stop is now secure.
 View in gallery
 Nosotros motility on to the "floating" post side of things. Considering the vertical post hither is only continued to the bottom railing via two pocket screws on the bottom, we're going to add together support with two more 6" timber screws. Predrill through the vertical post into the tiptop part of the lesser railing, taking care not to aim too high, which will betrayal the screw cease and exist ugly.
 View in gallery
 At present, considering the trim slice will hit in the middle of these screws' heads, we accept to counter-sink them with a i/two″ drill chip.
 View in gallery
 Screw the timber screws into the vertical post all the way, so their heads fall at or below the vertical post face up. They'll be tucked abroad here, actually subconscious completely from view when nosotros're washed with them.
 View in gallery
 At this signal, before the post is mounted to the floor, we wanted the railing to be one seamless slice to ensure that it will all fit and work together equally planned. Supervene upon all your spindles and the top railing. When the railing is affluent with the summit of your vertical posts, use two-i/ii" HD pocket screws to adhere the end of the railing to the wall-mounted vertical postal service via the top pocket holes.
 View in gallery
 Exercise the same on the bottom pocket holes.
 View in gallery
 And echo for the "floating" postal service end, top and bottom pocket holes of the elevation railing into the vertical mail service.
 View in gallery
 Because screwing into pocket holes can sometimes (not ever, but sometimes) move the entire slice a fraction of an inch, we wanted the floating end to be secured to the flooring before attaching the pocket screws. So, nosotros centered and marked where we wanted four sets of timber screws forth/through the bottom railing.
 View in gallery
 Predrill these holes for the 6" timber screws.
 View in gallery
 Install the timber screws, taking care with the first i particularly that the handrail is precisely in place and level everywhere.
 View in gallery
 Here is i ready of timber screws.
 View in gallery
 I like how these lucifer the black balusters without being overt and obvious.
 View in gallery
 We did iv sets full forth the bottom railing, evenly spaced, to secure the bottom railing more thoroughly to the floor. Now, utilise those 2-1/2" Hd pocket screws and secure the floating mail service to the floor via the four pocket holes.
 View in gallery
 With everything completely installed and secure, information technology'southward time to think most trim. Measure out and mark your one/3 trim boards to prevarication flush confronting the wall, the bottom railing, and the floating vertical post. Use a miter saw to cut a 45-degree bending that leads OUT AND AWAY from the measured distance.
 View in gallery
 Repeat for both sides of your handrail, then cut the top piece with two 45-degree angles to fit perfectly against them.
 View in gallery
 Fill the tops of your pocket holes with wood filler, considering these will exist visible to a higher place your 1×3 trim board. Let them dry, then sand with 220-grit sandpaper until they are polish and the wood filler perimeter disappears.
 View in gallery
 Measure, mark, and cut your 1×6 board to extend 3/4" or 1" longer than your entire top surface (vertical post end to vertical post end). Sand this board until it'southward perfectly smooth. Run a bead of wood glue along the superlative of your vertical posts and top railing.
 View in gallery
 Center, then lay your one×vi on pinnacle of your handrail. Clamp into place.
 View in gallery
 Use one-1/4" or ane-1/2" brad nails to boom cap board into place.
 View in gallery
 These nail holes volition exist visible, so you're going to desire to fill them to re-create your smooth handrail top.
 View in gallery
 Fill with wood filler, let it dry, then sand it smooth.
 View in gallery
 Your pocket hole forest filler sands easily and volition expect something similar this.
 View in gallery
 Your handrail cap board will be perfectly smooth and delightful afterward sanding. Wipe away all sanding grit.
 View in gallery
 Stain if you want. In this example, we skipped the stain and simply applied a few coats of matte articulate Polycrylic.
 View in gallery
 Even without staining, the clear coat brings out the woods'due south natural beautiful wood grain. We admittedly love this.
 View in gallery
 There is a richness in the woods grain with a unproblematic clear coat. Employ, then sand with fine grit, then utilise a second glaze. Repeat sanding and application for a tertiary coat.
 View in gallery
 Let it dry. Congratulations! Your new contemporary-industrial handrail looks gorgeous.
 View in gallery
 Blackness pipe runway (aka balusters or spindles) are both straightforward and chic.
 View in gallery
 The contrast of the black spindles of this stair railing and the blonde woods is striking. When you have other wooden elements in your infinite (such equally a stained hardwood flooring), consider contrasting your handrail wood with those other elements to let it stand out.
 View in gallery
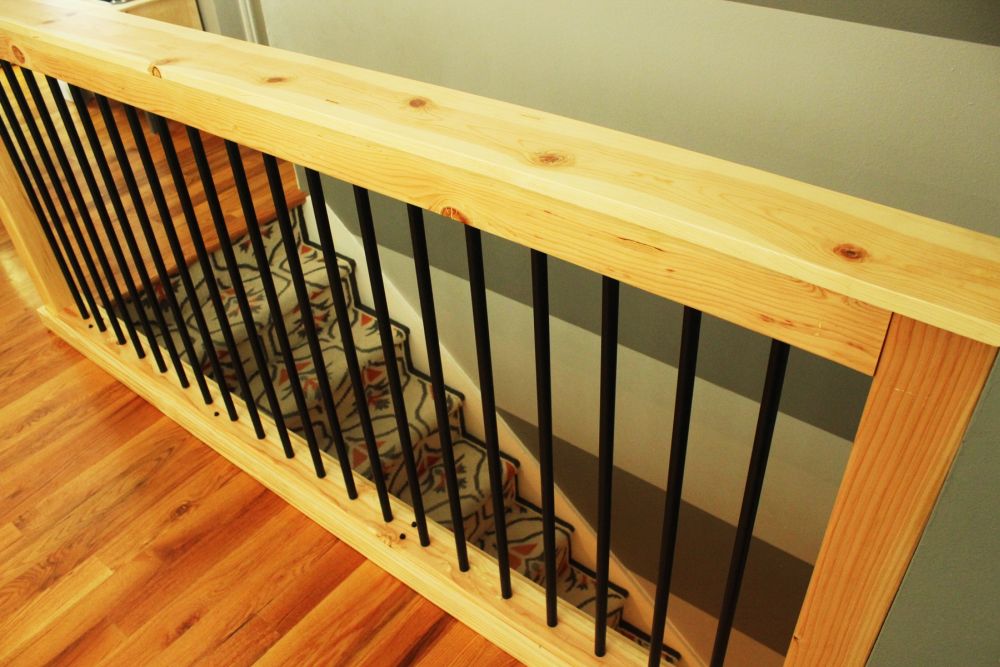
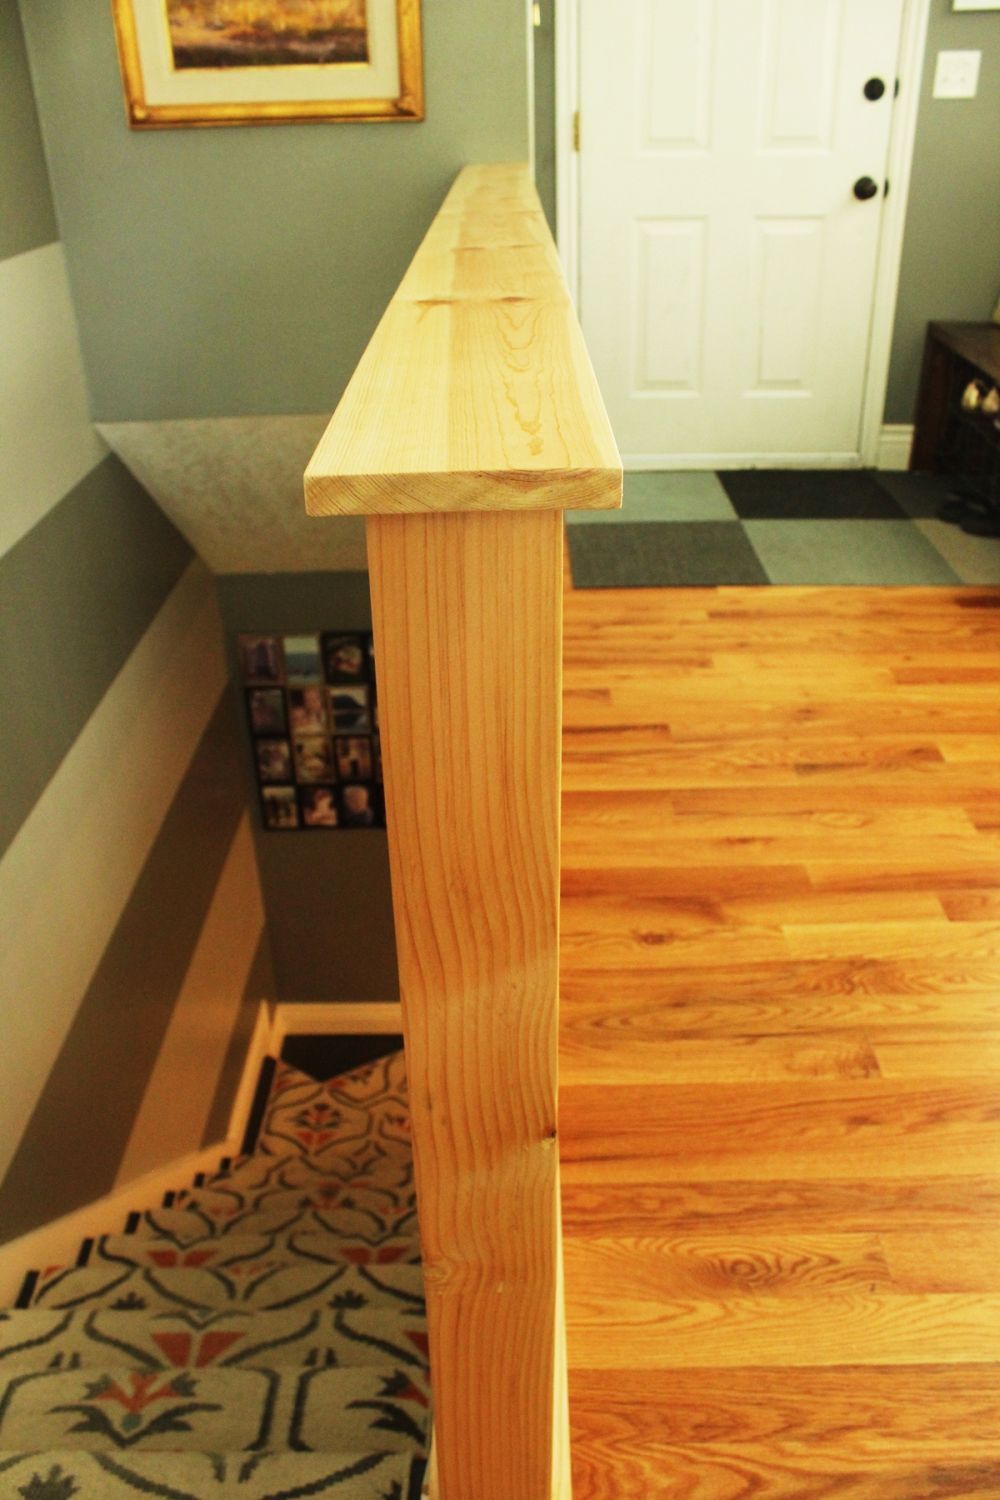
 You lot tin meet hither the overhang of the 1×6 cap board. This adds some substance to the railing, as well as hides the holes and flaws underneath. Information technology does have a bit of craftsman season, too.
 View in gallery
 Here is a closeup of the half-filled pocket holes, covered with trim and sealed upward. At this distance, the wood filler might look a little overt…
 View in gallery
 …merely you can run into here that, visually taken in with the overall handrail, the pocket hole filler becomes virtually invisible. In addition to the aesthetic comeback, I similar the idea of having the holes filled and flush with the rest of the woods, so they don't collect grit, crud, and/or bugs.
 View in gallery
 The stair railing hither becomes more of a statement slice than the painted builder-class handrail that was here before. This is a huge bonus for the stair railing that lives in the entryway, for sure.
 View in gallery
 Improve yet, the less-than-4" spacing between each rail is up to code, and the increase in railing tiptop is more comfortable and safe for our household.
 View in gallery
 Nosotros hope you notice this DIY stair handrail tutorial helpful and useful. Happy DIYing!
hamiltonthapponevess.blogspot.com
Source: https://www.homedit.com/stair-handrail/
0 Response to "DIY Stair Handrail with Industrial Pipes and Wood"
Post a Comment